ZeBeDee
HOWTO Setup a Windows-VPN-tunnel with ZeBeDee
Background
I found ZeBeDee many years ago and liked the simple approach of a VPN-tunnel.
After using it for accessing different windows machines a problem arose with Windows 7.
Tunnel Basic Setup, Client Side
- Setup av loopback adapter:
- System->Control Panel->Add Hardware
- Yes, Hardware is already connected
- Add a new hardware device (at bottom of list)
- Install the hardware that I manually select
- Network adapters
- Microsoft , Microsoft Loopback Adapter
- (Go through the installation procedure.)
- Enter a fake address, e.g.
192.168.192.168 (255.255.255.0)
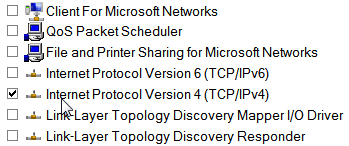
- Open your new fake ethernet adapter (Network Connections)
- Disable all but TCP/IPv4, as image show on right.
- Click on properties for TCP/IPv4.
- Enter your chosen IP address (192.168.192.168), subnet mask (255.255.255.0), and nothing else
- Under advanced->WINS, Disable NetBIOS over TCP/IP
- Download ZeBeDee to the Client
- Unzip into a folder, I use
C:\Programs\ZeBeDee
- Edit the config file
C:\Programs\ZeBeDee\SERVERNAME_client.zbd
####
# Zebedee client configuration file
verbosity 1
detached false	# (false for service)

# Client mode
server false
serverport 8080

# serverhost SERVERNAME.domain.tld, this is the server-adress
serverhost 1.2.3.4

# ZBD-Loopback connector for SERVERNAME, the one installed above, you need one for each server...
listenip 192.168.192.168

ipmode both	# Operate in mixed TCP/UDP mode
compression zlib:9	# Allow maximum zlib compression
keylength 256		# Allow keys up to 256 bits
keylifetime 36000	# Shared keys last 10 hours
keygenlevel 2	# Generate maximum strength private keys
maxbufsize 16383	# Allow maximum possible buffer size

logfile 'c:\Programs\Zebedee\SERVERNAME_client.log'
#
include 'c:\Programs\Zebedee\COMPUTERNAME.key'

# Setup tunnels
tunnel 445/tcp:*:445     # SMB via tunnel
tunnel 3389/tcp:*:3389   # Remote Desktop via tunnel
- Install ZeBeDee as a service
C:\Programs\ZeBeDee\SERVERNAME_client_install.cmd
c:
cd \programs\zebedee
zebedee -n "ZeBeDee-SERVERNAME-p8080" -Sinstall=c:\programs\zebedee\SERVERNAME_client.zbd

rem zebedee -n "ZeBeDee-SERVERNAME-p8080" -Sremove
- Start the "ZeBeDee-SERVERNAME-p8080" service.
IF you need to map a network drive to the server, (the tunnel 445/tcp:*:445 row above) you need to Disable the Port445
Disable Port445
If you disable 445, your client can not act as fileserver from clients with netbios over tcp/ip disabled!
Method 1
I found the below method the easiest one.
- Set the Server Service to Start to Automatic Delayed:

- Set the ZeBeDee to Start to Automatic:

- Reboot
Now when server starts ZeBeDee already have 445 and the Server Service fall back to UDP 137,138 TCP 139.
Method 2
I used this registry script to shutdown 445 before
Windows Registry Editor Version 5.00

[HKEY_LOCAL_MACHINE\SOFTWARE\Microsoft\Ole]
"EnableDCOM"="N"
"EnableRemoteConnect"="N"

[HKEY_LOCAL_MACHINE\SYSTEM\CurrentControlSet\Services\NetBT\Parameters]
"TransportBindName"=""
"SmbDeviceEnabled"=dword:0

[HKEY_LOCAL_MACHINE\SYSTEM\CurrentControlSet\Services\TCPIP6\Parameters]
"DisabledComponents"=dword:000000ff
Check netstat -an to see that 0.0.0.0 does not bound to 445
Method, after Windows 10 update
I needed to disable the TCPIP6 again:
reg add hklm\system\currentcontrolset\services\tcpip6\parameters /v DisabledComponents /t REG_DWORD /d 0xffffffff
Tunnel Basic Setup, Server Side
- Download ZeBeDee to the Server
- Unzip into a folder, I use
C:\Programs\ZeBeDee
- Use a config file
C:\Programs\ZeBeDee\SERVERNAME_server.zbd
####
# Zebedee SERVER configuration file
#
verbosity 0	# (0-5) Output to logg file, when everything ok set to 0...
detached false	# (false for service)

# Server mode
server true
serverport 8080

# Some communcation parameters
ipmode both	# Operate in mixed TCP/UDP mode
compression zlib:9	# Allow maximum zlib compression
keylength 256		# Allow keys up to 256 bits
keylifetime 36000	# Shared keys last 10 hours
keygenlevel 2	# Generate maximum strength private keys
maxbufsize 16383	# Allow maximum possible buffer size

# The Public key for the server
include 'c:\Programs\Zebedee\SERVERNAME.key'

# The logfile, adjust verbosity above
logfile 'c:\Programs\Zebedee\SERVERNAME_server.log'

# Private keys, se example
checkidfile 'c:\Programs\Zebedee\SERVERNAME_clients.id'

# no default redriection
redirect none

# Tip Use real IP instead of localhost for server
# Setup ALLOWED targets SERVERNAME IP=192.168.0.11
target 192.168.0.11:445,3389
target 192.168.0.11
- Install ZeBeDee as a service
C:\Programs\ZeBeDee\SERVERNAME_server_install.cmd
c:
cd \programs\zebedee
zebedee -n "ZeBeDee-SERVERNAME" -Sinstall=c:\programs\zebedee\SERVERNAME_server.zbd

rem zebedee -n "ZeBeDee-SERVERNAME" -Sremove
- Start the ZeBeDee Service
Use Tunnel, eg. map drive
NET USE X: \\192.168.192.168\Shares
HOWTO Setup a Windows-VPN-tunnel with ZeBeDee
Background
I found ZeBeDee many years ago and liked the simple approach of a VPN-tunnel. After using it for accessing different windows machines a problem arose with Windows 7.Tunnel Basic Setup, Client Side
- Setup av loopback adapter:
- System->Control Panel->Add Hardware
- Yes, Hardware is already connected
- Add a new hardware device (at bottom of list)
- Install the hardware that I manually select
- Network adapters
- Microsoft , Microsoft Loopback Adapter
- (Go through the installation procedure.)
- Enter a fake address, e.g.
192.168.192.168 (255.255.255.0)
- Open your new fake ethernet adapter (Network Connections)
- Disable all but TCP/IPv4, as image show on right.
- Click on properties for TCP/IPv4.
- Enter your chosen IP address (192.168.192.168), subnet mask (255.255.255.0), and nothing else
- Under advanced->WINS, Disable NetBIOS over TCP/IP
- Download ZeBeDee to the Client
- Unzip into a folder, I use
C:\Programs\ZeBeDee - Edit the config file
C:\Programs\ZeBeDee\SERVERNAME_client.zbd#### # Zebedee client configuration file verbosity 1 detached false # (false for service) # Client mode server false serverport 8080 # serverhost SERVERNAME.domain.tld, this is the server-adress serverhost 1.2.3.4 # ZBD-Loopback connector for SERVERNAME, the one installed above, you need one for each server... listenip 192.168.192.168 ipmode both # Operate in mixed TCP/UDP mode compression zlib:9 # Allow maximum zlib compression keylength 256 # Allow keys up to 256 bits keylifetime 36000 # Shared keys last 10 hours keygenlevel 2 # Generate maximum strength private keys maxbufsize 16383 # Allow maximum possible buffer size logfile 'c:\Programs\Zebedee\SERVERNAME_client.log' # include 'c:\Programs\Zebedee\COMPUTERNAME.key' # Setup tunnels tunnel 445/tcp:*:445 # SMB via tunnel tunnel 3389/tcp:*:3389 # Remote Desktop via tunnel
- Install ZeBeDee as a service
C:\Programs\ZeBeDee\SERVERNAME_client_install.cmdc: cd \programs\zebedee zebedee -n "ZeBeDee-SERVERNAME-p8080" -Sinstall=c:\programs\zebedee\SERVERNAME_client.zbd rem zebedee -n "ZeBeDee-SERVERNAME-p8080" -Sremove
- Start the "ZeBeDee-SERVERNAME-p8080" service.
IF you need to map a network drive to the server, (the tunnel 445/tcp:*:445 row above) you need to Disable the Port445
Disable Port445
If you disable 445, your client can not act as fileserver from clients with netbios over tcp/ip disabled!Method 1
I found the below method the easiest one.- Set the Server Service to Start to Automatic Delayed:
- Set the ZeBeDee to Start to Automatic:
- Reboot
Method 2
I used this registry script to shutdown 445 beforeWindows Registry Editor Version 5.00 [HKEY_LOCAL_MACHINE\SOFTWARE\Microsoft\Ole] "EnableDCOM"="N" "EnableRemoteConnect"="N" [HKEY_LOCAL_MACHINE\SYSTEM\CurrentControlSet\Services\NetBT\Parameters] "TransportBindName"="" "SmbDeviceEnabled"=dword:0 [HKEY_LOCAL_MACHINE\SYSTEM\CurrentControlSet\Services\TCPIP6\Parameters] "DisabledComponents"=dword:000000ff
Check
netstat -an to see that 0.0.0.0 does not bound to 445
Method, after Windows 10 update
I needed to disable the TCPIP6 again:reg add hklm\system\currentcontrolset\services\tcpip6\parameters /v DisabledComponents /t REG_DWORD /d 0xffffffff
Tunnel Basic Setup, Server Side
- Download ZeBeDee to the Server
- Unzip into a folder, I use
C:\Programs\ZeBeDee - Use a config file
C:\Programs\ZeBeDee\SERVERNAME_server.zbd#### # Zebedee SERVER configuration file # verbosity 0 # (0-5) Output to logg file, when everything ok set to 0... detached false # (false for service) # Server mode server true serverport 8080 # Some communcation parameters ipmode both # Operate in mixed TCP/UDP mode compression zlib:9 # Allow maximum zlib compression keylength 256 # Allow keys up to 256 bits keylifetime 36000 # Shared keys last 10 hours keygenlevel 2 # Generate maximum strength private keys maxbufsize 16383 # Allow maximum possible buffer size # The Public key for the server include 'c:\Programs\Zebedee\SERVERNAME.key' # The logfile, adjust verbosity above logfile 'c:\Programs\Zebedee\SERVERNAME_server.log' # Private keys, se example checkidfile 'c:\Programs\Zebedee\SERVERNAME_clients.id' # no default redriection redirect none # Tip Use real IP instead of localhost for server # Setup ALLOWED targets SERVERNAME IP=192.168.0.11 target 192.168.0.11:445,3389 target 192.168.0.11
- Install ZeBeDee as a service
C:\Programs\ZeBeDee\SERVERNAME_server_install.cmdc: cd \programs\zebedee zebedee -n "ZeBeDee-SERVERNAME" -Sinstall=c:\programs\zebedee\SERVERNAME_server.zbd rem zebedee -n "ZeBeDee-SERVERNAME" -Sremove
- Start the ZeBeDee Service
Use Tunnel, eg. map drive
NET USE X: \\192.168.192.168\Shares
Remember to use both allowed targets at SERVER and tunnel at CLIENT when adding ports.
Private/Public Keys
To generate a pair of keys you can use thisC:\Programs\ZeBeDee\KeyIdGen.cmd
set c=%1
if "%c%"=="" set c=%COMPUTERNAME%

cd c:\programs\zebedee
zebedee -p >%c%.key
zebedee -P -f %c%.key >%c%.id
Remember to append the SERVERNAME_clients.id file with the row in COMPUTERNAME.id file.
Example scripts above
 ZeBeDee_Example.zip
Keywords:
zebedee,vpn,tunnel,445,139,port445,port139,net,map,use,smb,Win7,Windows7,WindowsXP,Windows2008,Windows10,Win10